 By Professor Henry Greenside
Department of Physics, Duke University
Introduction: what is a screencast and what is a screencast good for?
The enormous success of Khan Academy‘s free online tutorials for students ranging from elementary school to college has made many educators aware of the benefits of using short (5-10 minute-long) screencasts to supplement or to flip a class, so that students spend more of their class time actively asking questions and solving problems, and less time listening passively to the instructor.
A screencast is a video file that displays in real-time what someone is writing on some screen, usually with an audio explanation of what is being written. Watching a screencast is similar to watching a video of an instructor writing on a board in front of a class but a screencast can be more effective pedagogically since a student sees only what is being written on the screen, and so is not distracted visually by details of the instructor or of the classroom. Screencasts can also be more effective than recording a PowerPoint-like presentation since a screencast allows a student to see step-by-step how an instructor assembles or creates complicated ideas, say by writing out and describing successive steps of some mathematical derivation, or by drawing some complicated diagram part by part, or by rewriting a sentence to be more grammatical and clear. In contrast, PowerPoint-like slides involve preassembled information, say a slide of several typeset equations or a slide containing a polished figure from a textbook, and it is then more difficult for student to understand the many details of such a slide since all the details are visually presented at the same time, or to reproduce some of the details by writing out the math or by drawing a figure on his or her own.
In this post, I discuss how one can create screencasts easily, inexpensively (less than $550 for all hardware and software as of the date of this post), and with good quality by using an Android tablet, specifically a Samsung Galaxy Note 10.1 2014 tablet, with an Android application called LectureNotes.
I learned to use this combination of software and hardware in the context of creating screencasts for my spring 2014 course Physics 162L (“Electricity, Magnetism, and Light”) of thirty students, and I found the screencasts to be a useful way to supplement the classes and the assigned textbook reading. I also found the screencasts to be a useful way to answer some student questions outside of class, e.g. it was quick and easy for me to answer some student questions by my creating and posting brief screencasts that could include drawing sketches or doing some mathematics; this was much better than trying to provide an answer verbally via email.
My hope is that this post will give Duke instructors a sense of how easy it is to create a screencast using current tablet technology and software, and so encourage them to create screencasts for their own classes. In a separate later post, I will discuss some of my thoughts about the educational aspects of using screencasts compared to other ways of making a class more active such as using clickers (which involve asking a class to discuss some question in groups and then poll all students anonymously to find out if the students have understood some key point) or by using pre-lecture online questions related to assigned reading.
Why I chose a Samsung tablet with an active stylus for screencasting
Before discussing the key steps required to create and share a screencast, I would like to discuss briefly what hardware and software options are available for creating screencasts and why I chose specifically a Samsung Galaxy Note 10.1 2014 tablet with a so-called active stylus.

Since screencasts involve recording what you write and draw on some touch-sensitive electronic screen, a key detail that determines the ease of creating a screencast and the quality of the screencast is what you use to write on the screen. The best current technology is to use a so-called “active stylus” which is a pencil-like object that contains circuitry that actively and continuously transmits to a tablet or computer the precise location of the tip of the stylus, even when the tip is not in contact with the screen. Active styluses have two benefits over “passive” styluses such as your fingertip, which communicate with a screen just by direct mechanical touches. First, an active stylus allows you to draw fine precise lines on the screen, basically with the same quality as writing on paper with a pen that has a fine point. Second, an active stylus lets you rest your hand on the surface of the tablet while you are writing, just as you would rest your hand on a sheet of paper while writing. (The active transmitter in the stylus allows the tablet to ignore any input to the screen except what is coming from the stylus.) This is an important detail since you can then write in a way that is comfortable for many minutes. With a passive stylus, you have to hold your hand above the screen while writing (so that the edge of your hand does not accidentally trigger some software command or cause unintended drawing), which is tiring and awkward when creating a screencast that is many minutes long.
Active styluses are also better for sketching since they transmit to the tablet or computer how firmly you are pressing down on the screen as you draw, which allows you to vary the thickness of your pen strokes smoothly and naturally, from thin to thick.
Active styluses are a more expensive technology and so most tablets reduce their costs by using passive styluses, most often a fingertip or you can purchase for $10 or so a pencil-like stylus that has a rather thick rubber-like ball that mimics the tip of a finger. Writing with a passive stylus is much like writing with a fat crayon while holding your hand in the air above a table, one simply cannot write or draw as clearly, quickly, or comfortably as one does with an active stylus. Passive styluses are especially awkward to use when writing a lot of mathematical symbols that require fine strokes since one is forced to write big letters to overcome the thick strokes, and so one can not fit much information on the screen and the writing does not look attractive.
So a simple conclusion based on my trying different hardware and software combinations for creating screencasts is that you should use an active stylus since that allows you to write with precision and to rest your hand comfortably on the tablet screen without side effects. At the time of this post, the best hardware solutions for creating screencasts are the Surface Pro tablets produced by Microsoft and several Android-based tablets, for which Samsung is arguably the market leader. The tablets sold by these companies come with an active stylus and have been designed to use their active stylus in a consistent useful way. For example, for the Surface Pro tablets and for the Android tablets, anywhere you can type in text with a keyboard you have the option to input text by writing the text with your stylus and having the tablet convert your handwriting to typed letters. (The conversion process is remarkably accurate, and both of these systems go a step further and can convert hand-drawn mathematical expressions of considerable complexity to a high-quality typeset form.)
The Android tablets with active styluses have the advantage over the Surface Pro products of being less expensive ($500 versus $1200), thinner (so easier to write on), more lightweight (1.2 pounds vs 2.2 pounds) and having superior and more rapidly improving screencasting software (the benefit of many Android vendors competing in a market of millions of users, versus a Surface Pro community of tens of thousands of people). But Android tablets have the disadvantage of being much less powerful than a Surface Pro tablet (which is basically a fully powered Windows 8.1 laptop disguised as a tablet), and so the Surface Pro tablet is the better choice for Duke instructors who, in addition to creating screencasts or as part of creating a screencast, need to run programs like Mathematica or Matlab (which are not available on Android or Apple tablets), who need to write and run substantial computer programs, or who need to run other kinds of software like spreadsheets, databases, or video editing programs.
Note: for those of you who already own an Apple iPad and who want to create screencasts, it is possible to do so using excellent applications like “Explain Everything”. But creating quality screencasts on an iPad is more difficult since Apple’s tablet operating system iOS currently does not support active styluses. This means you have to buy your own active stylus (and possibly purchase extra hardware to attach to your iPad so that the iPad can detect the active stylus), and it means that each stylus company and each iPad program are figuring out independently, and often inconsistently, how some vendor’s stylus will work with some other vendor’s program; it can well be the case that a stylus that works for one iPad program will not work well (or at all) with some other program. Also, you cannot input text via the stylus in any text box, the way you can for the non-Apple tablets that come with active styluses.
For my Physics 162L class, I was only interested in creating screencasts that would involve my drawing and writing so I did not need the greater power of the Surface Pro tablets. I also wanted to buy a tablet that I could use for academic needs when I was not creating screencasts (say for taking notes in seminars, for reading and annotating PDF files of journal articles, and for sharing research videos and plots with research colleagues) and so I wanted to avoid the substantially heavier and thicker Surface Pro tablet since I would sometimes be carrying a laptop and tablet around. After some trial and error, I found that a complete package for creating screencasts for my Physics 162L class could be put together as follows:
- A 32-GB Samsung Note 10.1 2014-edition tablet (current price about $530).
Note: I found that one needs at least 32 GB of memory to store software and screencast videos, a tablet with 16 GB or less of storage will be impractical for screencasting. - Three related Android applications called LectureNotes, LectureVideos, and PDFView, all made by the same company Acadoid Developer (total cost for the three applications is about $10).
LectureNotes is actually the top Android program for taking handwritten notes but the author added video recording features that made the same program one of the best screencasting programs available on any tablet, Android, Apple, or Microsoft. - An external microphone for recording my voice during a screencast.
It turns out that the internal microphone of most tablets picks up the sounds of the stylus striking or rubbing against the surface and so one needs an external microphone to avoid these sounds. I found that a $3 Samsung microphone with earbuds (model EH64AVFWE, designed for use with a Samsung phone) recorded my voice as clearly as a $50 external microphone and so was a good way to record voice. - A cloud storage account such as DropBox or Google Drive for storing files.
Such accounts are free (at least for users with modest storage needs of say 5 gigabytes) and are needed as a practical way to transfer files from a tablet to a Duke computer or personal laptop, either for editing or for posting on the Internet for your class to download.
The total current cost of this hardware and software is just under $550 as of June 2014.
Preparing to create a screencast
Preparing to create a screencast is much more work than creating the screencast itself (see the next section “Creating a Screencast”). The preparation is rather similar to preparing to give a lecture that involves mainly writing on a board in that you need to organize your thoughts and to strategize about how to present your information visually a screen at a time. One substantial way that screencasts differ from giving a lecture is that you have to be much more careful about what you draw and what you say since the screencast captures all the details permanently. This means also that you need to practice giving the screencast several times in advance before creating a final version.
My experience, and the experience of many others including Salman Khan, is that it is better to create screencasts of at most ten minutes in duration (and preferably shorter, say 4-8 minutes long) that focus on one example or on one well defined point at a time. (Flipping an hour-long class then would correspond to creating 5-8 short screencasts that students can watch in sequence.) A screencast of 4-8 minutes corresponds to explaining the material of just two to three PowerPoint-like slides so I prepare for a screencast by writing out what I plan to include in the screencast on two to three blank sheets of paper (turned sideways with the long edges along the top and bottom, to match the preferred orientation of the tablet’s screen for recording video). I then place these sheets near the tablet, to remind me what to write on each screen and what to say.
Since a screencast is a standard video file (say in the MP4 video format), it is straightforward to edit the file to make modest corrections. But in practice, I found (as some experienced screencasters had suggested to me) that it is quicker and easier to just create a new screencast from scratch if some mistake is made. In fact, I found that to create a 4-8 minute long screencast consisting of 2-3 successive screens of information, it was easiest and best to record the screencast in roughly 2-minute long separate video files, say corresponding to one screen at a time, and then use the ability of the LectureNotes program to combine the short separate videos into a single final screencast file. This means that fixing some mistake typically involved just creating a new 2-minute recording, which was indeed easy and straightforward to do.
I should note that some screencasting software like Panopto (this is the software that Duke instructors have been using to create screencasts that involve using several different programs such as PowerPoint or Matlab) is able to generate bookmarks and a table of contents of the bookmarks for the video file so that students can quickly jump to different parts of a long video. But creating short successive screencasts serves the same purpose, and the name of the screencast file can indicate what is the content of the screencast. The LectureNotes screencasting software that I used and describe below has the ability to glue several successive short video files into a single longer file so you can always create one larger file from shorter files if need be.
Another requirement for preparing to create a screencast is to find a quiet environment (no background noises) where no one will interrupt you and you won’t be visually distracted. So you should tell your family members or friends not to interrupt you, close your office door, and silence all nearby phones. It is also helpful to have a large well-lit desk so you can spread out the written sheets that will serve as your screencast guide and so that you can write comfortably on the tablet with your stylus.
The final step is to prepare your tablet for recording your voice by plugging your external microphone into the headphone jack of the tablet and placing the microphone on the surface of your desk within a foot or so of your face and where you won’t bump the microphone’s cable accidentally.
How to create a screencast
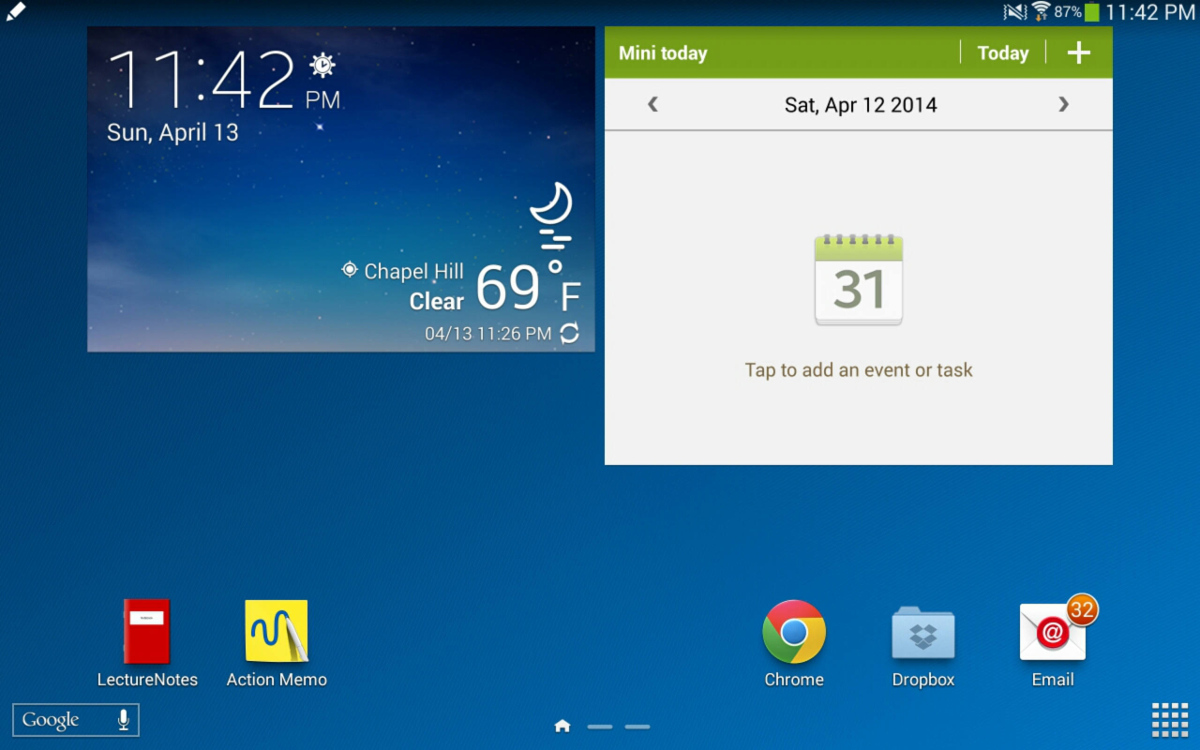
Now that you have organized your thoughts on several sheets of paper and practiced in your mind what you plan to write and what you plan to say during your screencast, you can start the recording of your screencast. When you turn on an Android tablet like the Samsung Galaxy Note, you get a home screen that might look something like the image to the right.
To start the LectureNotes program that will record and generate your screencast, you touch with the stylus or with your finger the LectureNotes icon on the left bottom of the screen, at which point the homescreen is replaced with the LectureNotes program.
To start recording the screencast, you touch with the stylus the video camera icon in the upper right, which starts blinking and displaying the elapsed time in minutes and seconds. You then start writing anywhere on the screen under the top icon bar while also talking into the microphone.
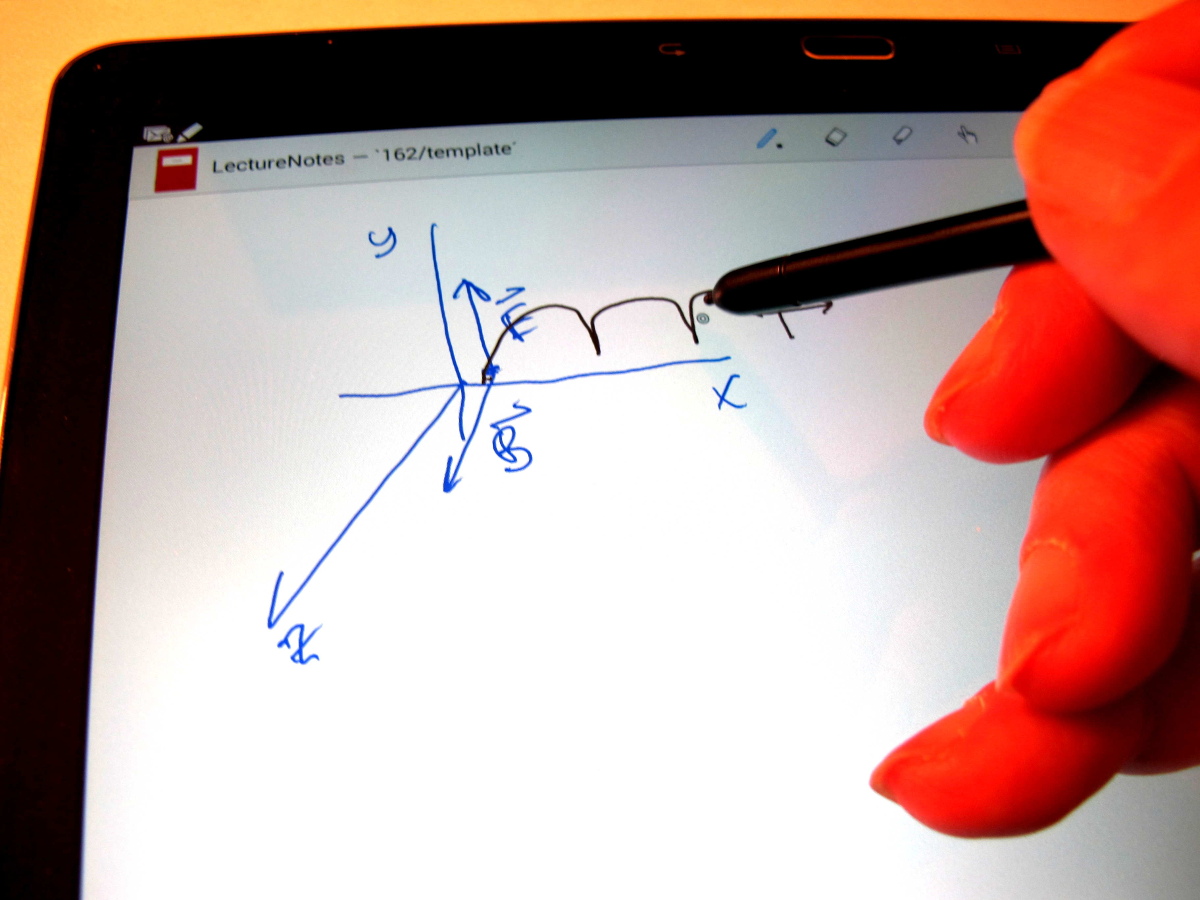
At any time, you can change the color or thickness of the line created by your stylus by touching the pen icon (this is the first icon to the right of the words 162/template) to bring up a menu of pen colors and thicknesses. If you make a mistake in writing or drawing something, you can undo recent pen strokes by clicking the undo icon (looks like left curved arrow) once or several times in a row. You can indicate a region of interest on the screen to the viewer by clicking the pointer icon, at which point a pointing arrow appears just under the tip of the stylus and this arrow moves around the screen without leaving any trace, just as if you were moving the dot of a laser pointer around a screen. To move to a new blank screen (similar to a blank slide) or to refer to some already created screen, you can move back and forth between screens by clicking on the right-pointing solid black triangle (third icon from the right), and on the the adjacent left-pointing triangle. (I don’t describe the use of the other icons shown since they are associated with features of the program related to note-taking or to annotating a PDF file rather than to creating a screencast.)
When you have finished creating your screencast, you touch the movie camera icon a second time which stops recording activity on the screen , stops recording audio, and saves all information into two files on the tablet, one file for the visual content of the screen and a separate file for the associated audio. You then need to go through a few more straightforward steps to create a final video file for your students to watch.
One next step is to tell the LectureNotes program to merge the two files into a single MP4 video file which is a useful format for displaying audiovisual information on the Internet. This is the one step for which using an Android tablet, even a high-end tablet like the Samsung Galaxy Note 10.1 2014, is painfully slow compared to using a Surface Pro tablet or a laptop. The conversion and merging of the files is such that, on this Samsung tablet, one minute of recording takes about one minute of processing time which means that a five-minute long screencast requires about five minutes to create a final MP4 file. The processing is so intense that the tablet is pretty much useless while the LectureNotes program is creating the final MP4 file, you basically need to do something else away from the tablet while the conversion and merging is taking place. I found in practice that it was about six times faster to first upload the video and audio files created by LectureNotes to my desktop computer and then run free public-domain programs like ffmpeg to create the MP4 file. (Please contact me if you would like to see how I do this using a so-called shell script to automate the process, the details are too technical to include here).
The final step is to upload the completed MP4 screencast file to a computer where you can then post it on the Internet for others to enjoy. One does this by touching (with stylus or finger) the “Share File” icon (second from the upper right in screen of LectureNotes above). LectureNotes then presents you with the option to select some cloud-based file system such as Dropbox or to email a copy of the file to yourself. You then tell LectureNotes (again by indicating with your stylus or finger) which file you wish to upload to Dropbox, at which point the file is uploaded via a wifi connection.
Screencast MP4 files created by LectureNotes turn out to be rather compact in size, about one megabyte of storage for each minute of recording if you use the default choices of screen resolution and of number of frames recorded per second (ten). So a five-minute recording leads to an approximately 5 megabyte MP4 screencast file, which takes just a few seconds to upload via Wifi if you have a good connection.
You can see some examples of screencasts that I created for my Physics 162L class. I should point out that the quality of these videos is set mainly by my limited experience in creating screencasts and by my limited artistic abilities, and not by the capabilities of the LectureNotes software. That software has enough options that one can create HDTV-like crystal clear recordings but at the expense of requiring more processing time and larger video files. For the purposes of creating educational screencasts for my physics class, I found the default choices reasonable and effective.
Conclusions
Rapid evolution in tablet hardware and software over the last two years has made the creation of high quality screencasts easy and inexpensive for Duke instructors. Although I strongly recommend your using a tablet with built-in support for an active stylus, basically any tablet made within the last two years is capable of running easy-to-use inexpensive software that will produce effective screencasts for your classes. The most time consuming part of creating a screencast is the effort needed to prepare a lecture (collecting and organizing thoughts, thinking about how to present the material as several successive slides) rather than actually recording and editing a video file. Duke instructors should therefore simply go ahead and try creating and using screencasts to see if they may be helpful for their classes.
If you would like to see first hand how to use the Samsung tablet and LectureNotes software to create a screencast, please feel free to email me at hsg@phy.duke.edu and I will be glad to show you in person how to do this.
Acknowledgements
I would like to thank Andrea Novicki and Randy Riddle for providing an opportunity for Duke instructors like myself to learn about and to try different teaching approaches, and for providing support for me to purchase and to explore the use of the Samsung tablet for my Physics 162L course. I would also like to thank Prof. Steve Wallace of Duke’s Biomedical Engineering Department for several helpful discussions about how he has been using a Microsoft Surface Pro 2 to create online videos for his engineering classes.
can the stylus work on other phone instead of samsung ?
thanks for sharing.