How do you create a warm-up activity in your online learning course or a flipping the classroom course to establish a learning community to engage students? Would you like students to practice their public speaking skills? Perhaps they need to do a short presentation on a topic?
In short, do you want your students to see and hear each other? You might consider asking your students to record videos of themselves within Sakai. They don’t need extra software; what they need is a webcam. These days, many students’ laptops have a built-in webcam or they own an external webcam already. Students use Skype or Google+ Hangouts to communicate with their parents, family, or friends, don’t they?

Ready to try?
1. First of all, let’s activate Media Gallery in Sakai via your course or project site’s Site Info > Edit Tools, find Media Gallery and check the box next to it. You’ll need to review the change and save it to finish.
2. At this point, you should share some tips with your students before they start to record. You might tell them to look at the webcam lens to have a good eye content. Let them know that they can playback and review their recording (and maybe re-record it) before posting. It is a good idea to create a video yourself as a model and set expectations about the length and topics to cover.
Click on Site Library and then the Upload New Media button

Click on Webcam
Marc Sperber (Educational Technologies Consultant, Duke Global Health Institute) has shared us the Instructions for creating video introduction of yourself that he created for students to make videos. [Thank you Marc !] Please feel free to post this document to your course site.
3. It’s time to share! You as an instructor must make that happen.
By default, your student videos in Media Gallery are only available to you and the owners of the videos. How do you share videos with the entire class?
Create a community “Collection”
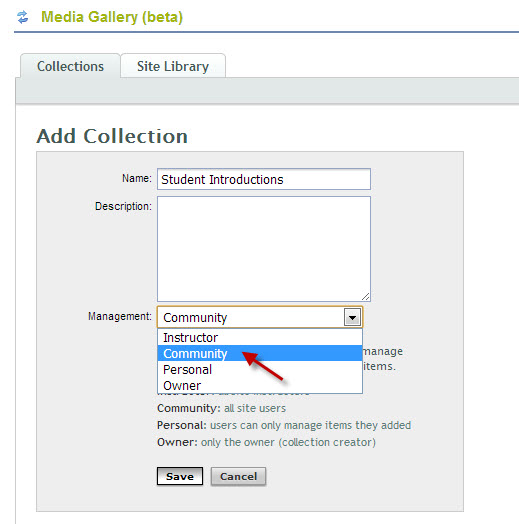
To make a Collection, click on the Collections tab at the top of the window and then on Add Collection. Give it a name such as “Student Introductions”.
Among the options of Instructor, Community, Personal and Owner, choose “Community”. This means all users in the site can add media to the collection. After the students record their videos, they can either add their videos to the collection themselves or you can do it afterwards.
To do so, enter the collection and click Manage Media link at the top of the window (or Add Media if there isn’t anything added yet). This will take you to a new page where you can see all the available videos on the right. Click on each video to add. When finished click I’m Done at the top of the collection.
The last step is to edit each video in the collection to make them public. Only the instructor can do this step. Hover over the video, and click Details at the bottom of the video. Check the box next to Public and Save.
Enjoy student videos!
More instructions about Media Gallery is available on our Sakai support site.


